You may be looking to create an environment where there are no ads at all across your home Wi-Fi. Or perhaps you are looking to create your own retro game console that fits in your pocket. All of these things can easily be done with the Raspberry Pi. This device is essentially a small computer that is cheaper than a pair of top-notch sneakers. After being launched in 2012, this platform became one of the most popular platforms for understanding hardware. Over the years, by 2024, the company sold more than 60 million units globally. Here, I will teach you how to get started.
What is a Raspberry Pi?
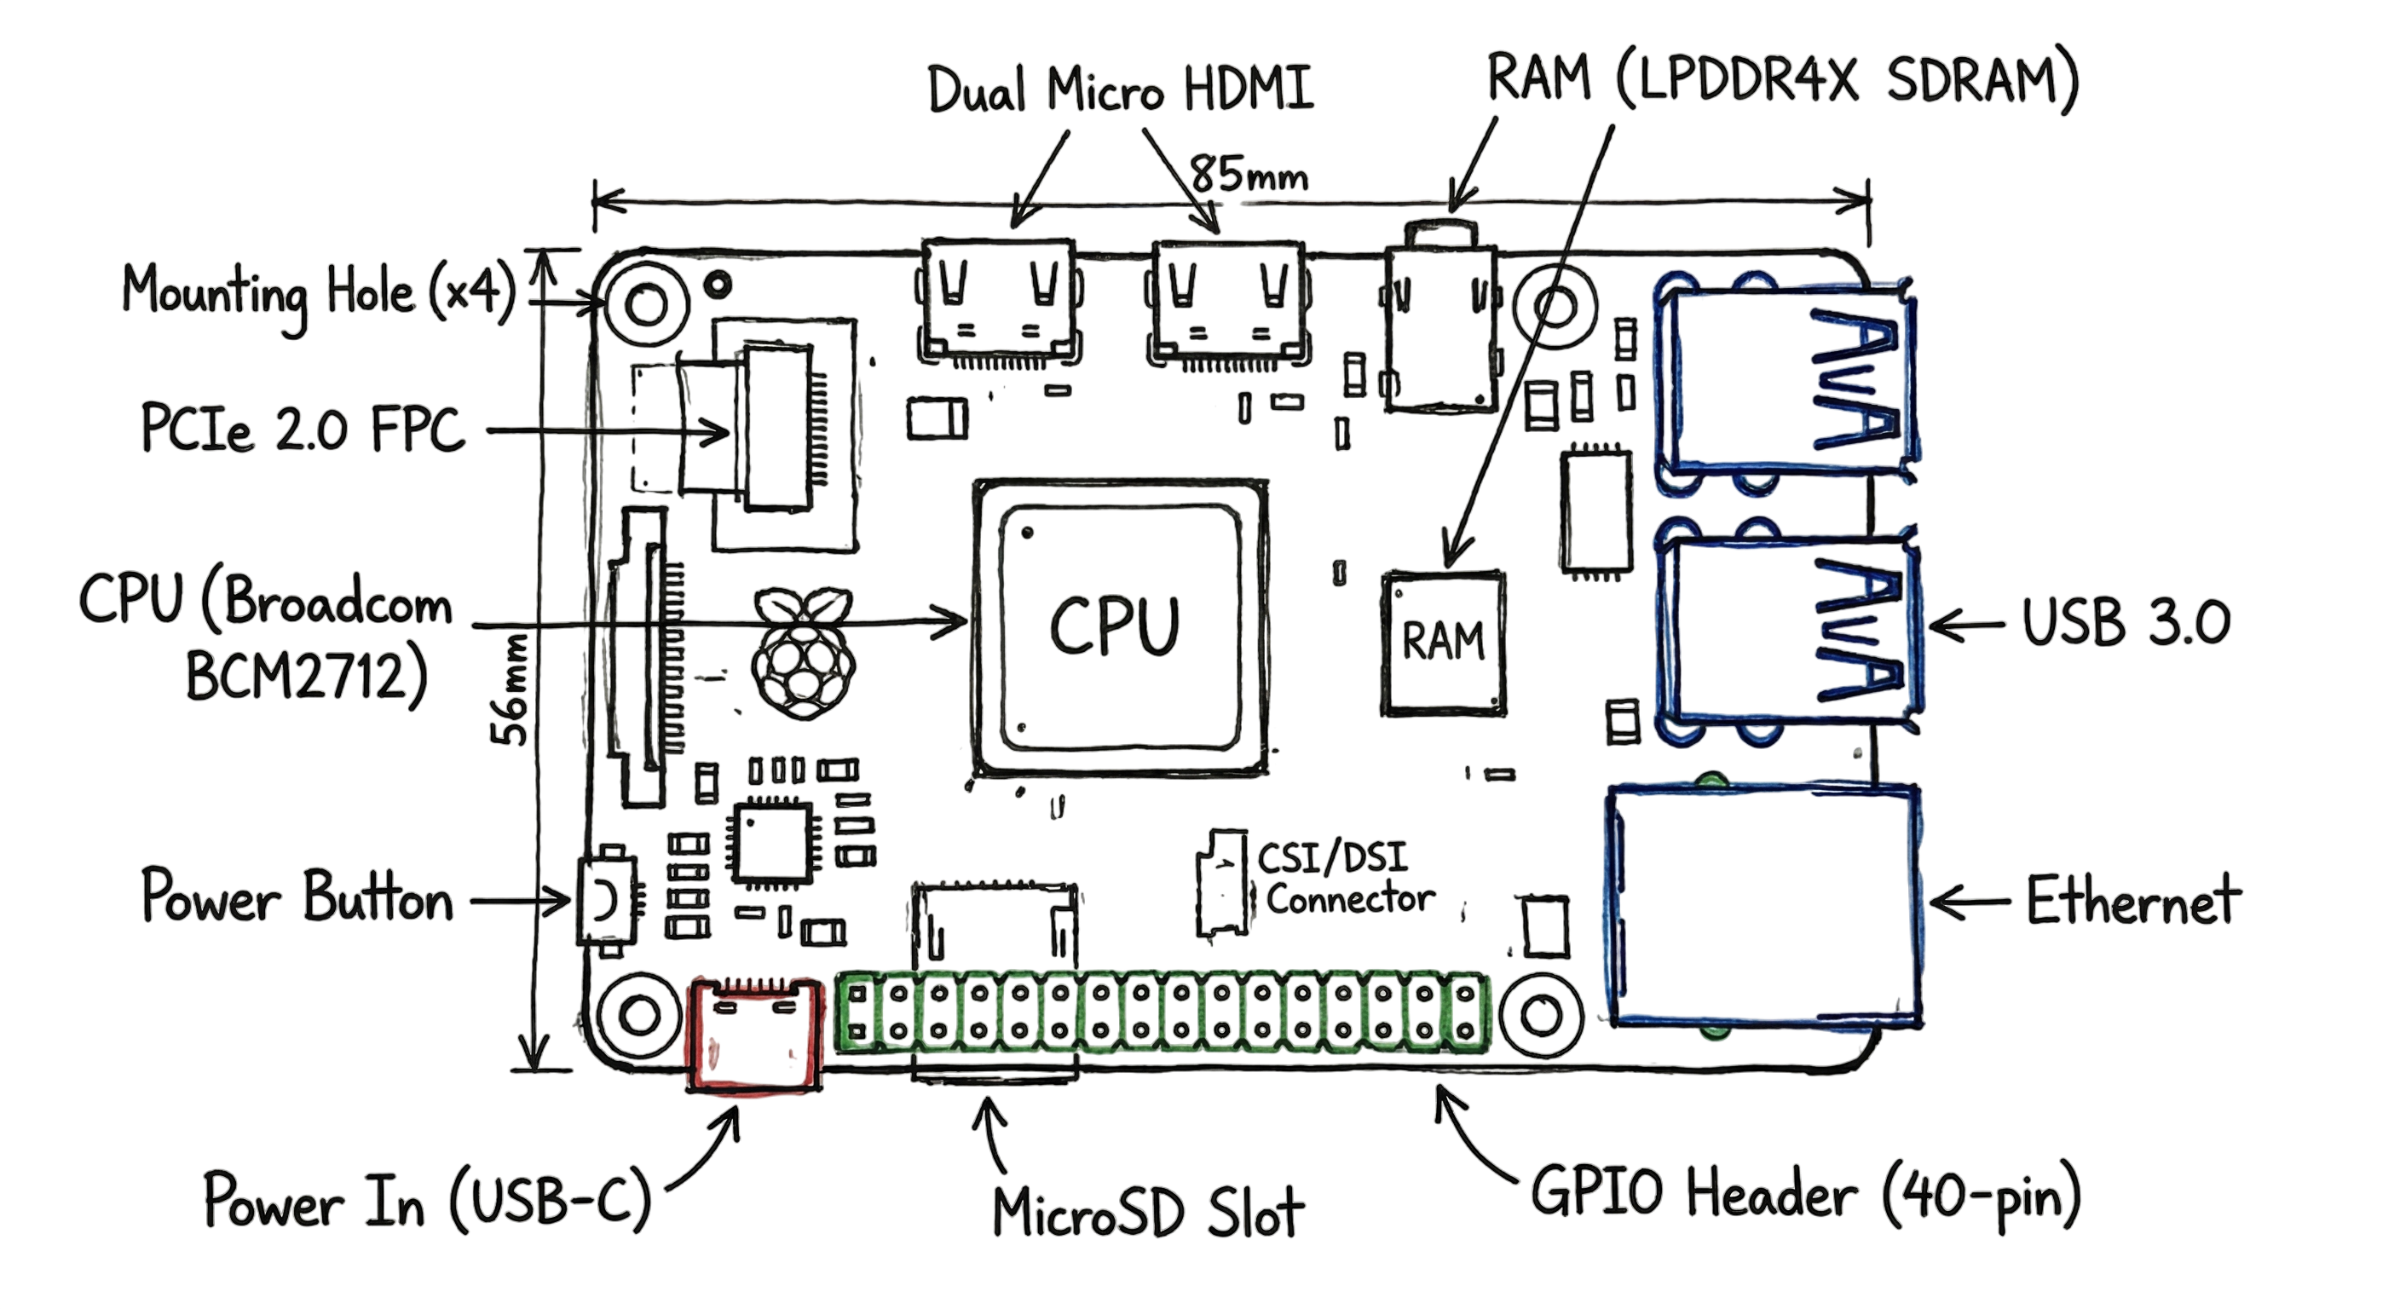
Raspberry Pi is a real computer made up of a single board. As opposed to a laptop, Raspberry Pi does not have any casing, display, or a keyboard. It uses an ARM-based CPU, which is pretty much similar to that used by your smartphones. The newest version Raspberry Pi 5 is three times more powerful than other versions of this computer. In addition, it can be used to drive two 4K displays at once. Therefore, you can substitute your basic PC with this small device in your daily life.
Speaking about connectivity options, you will find a lot of them on a Raspberry Pi board. To begin with, it has USB ports to connect your keyboard and mouse to the board. Besides that, there are also Ethernet ports to make wired connection of your computer, and a Wi-Fi module allowing wireless connection. However, the most interesting parts are those named GPIO ports.
Essential Tools for Your First Setup
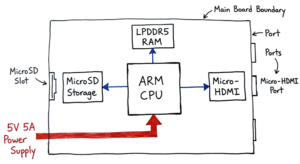
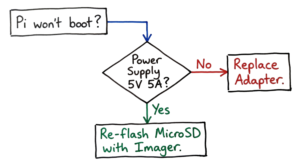
A Raspberry Pi will not work by merely plugging it into a wall socket. It needs some accessories before it can start running. I have noticed that many juniors become disappointed since they have employed a phone charger with insufficient amperage. The Pi 5 should be charged by a power source with an output of 5V 5A for it to function at optimal performance.
| Tool | Requirement | Function |
| Raspberry Pi 5 | 4GB or 8GB RAM | The main computer board |
| MicroSD Card | 16GB (Class 10) | Acts as the hard drive for the OS |
| Power Supply | 5V 5A USB-C | Provides stable electricity to the board |
| Micro HDMI Cable | 4K Compatible | Connects the Pi to a monitor or TV |
| USB Keyboard/Mouse | Standard | Allows you to interact with the OS |
How to Install Raspberry Pi OS
It needs to be stressed that this board comes without any operating system pre-installed by default. You need to “flash” this particular software onto the microSD card on another computer. The official software is Raspberry Pi OS. It is a modification of Linux running on a Debian-based system. By late 2025, this software will have been upgraded to the version supported by Debian 13, named “Trixie”. The newest update includes a new control centre which will facilitate the management of your settings significantly.
- To customize your microSD card, please follow these instructions.
- On your PC or laptop, install the Raspberry Pi Imager program.
- To connect your microSD card to your computer or laptop, use an adapter.
- Launch the Imager program and choose the model and operating system of your Raspberry Pi.
- Click “Edit Settings” to enter your password and Wi-Fi name.
- Click “Write” and watch as the procedure completes.
But here comes the twist. After configuring your microSD card you should put it in a special port on the bottom side of the Pi. Don’t connect the board to power right now; connect the monitor and the keyboard. The first booting will take some time because of the resizing of the storage. Now you can start programming.
Understanding the GPIO Pins
The majority of individuals become perplexed at this point. Your code and the real world are connected by the GPIO pins. These pins lack a protective casing, in contrast to USB ports. The board may sustain irreversible damage if a wire comes into contact with a 5V power pin and a ground pin. Before they put in the power, I always advise my staff to verify their wiring.
Each pin has a specific job. Some pins provide power at 3.3V or 5V. Others act as “Ground” to complete a circuit. The rest are programmable pins that you control using Python programming. You can write a script to turn pin 17 “High,” which sends electricity to an LED. Or you can set a pin to “Input” to read the signal from a motion sensor.
Five Most Effective Projects for Absolute Beginners
It is impossible to learn without doing, so the following projects will provide hands-on experience that utilizes standard software and explains how hardware and Linux work together.
- Pi-hole Ad Blocker
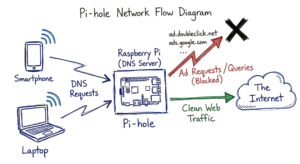
This is the most applicable project for anyone who wants to get rid of annoying ads at home. You simply install a special application, named Pi-hole. Then you configure this piece of software to be the DNS server for your house. All requests for advertising servers get filtered, and everything starts to work much better: your gadgets get rid of all unwanted advertisements.
- DIY Gaming Console
With the RetroPie system installed, your board becomes capable of running many games created during the glory days of video-gaming in the 80s and 90s. This is also a great example of file management and configuring USB controllers in Linux. - Self-made Streaming Media Center
LibreELEC media center allows you to stream movies and music to your TV via Raspberry Pi board. Moreover, you will learn how to configure the board to stream content from a hard drive or any network location. - Homemade Weather Station
You can easily attach a sensor (DHT11) to GPIO ports of the board and get information about temperature and humidity. The main goal of this project is learning basic coding in Python. - Automated Plant Monitor
In this project, you learn how to monitor soil moisture with the help of sensors. Then, the board sends a message via the Internet when soil gets too dry.
Real-World Example: The “Stuck” Network
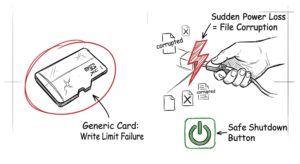
In real environments, it doesn’t work this cleanly. We had a client who complained that their internal dashboard was slow. They were running a custom monitoring script on a Raspberry Pi 4. The junior dev had used a cheap, generic microSD card. Because the script was writing logs every second, the card reached its “write limit” and started failing. This caused the whole network stack to hang. We replaced it with a high-end industrial SD card and moved the logs to a RAM disk. The system has been stable for two years since that fix. That is why you should never buy the cheapest SD card for a 24/7 project.
Enterprise Scenario: Secure Remote Access
I once helped a small engineering firm that needed to access their office hardware during a lockdown. They used a Raspberry Pi running “Raspberry Pi Connect” to create a secure gateway. This allowed them to log into their internal lab machines without opening risky ports in their firewall. We configured the Pi with a Palo Alto GlobalProtect VPN so that all traffic remained encrypted. It showed how a $60 board could handle a task that usually requires expensive enterprise hardware.
Raspberry Pi vs. Arduino: Which is Better?
One question I frequently receive is whether a beginner should begin with the Pi or the Arduino. This largely depends on what one hopes to achieve. The Arduino is a microcontroller. This works well with simple repetitive activities like turning on a motor. This device boots immediately and consumes minimal energy.

On the other hand, the Pi is a complete computer that boasts an operating system and filesystem. In addition, it can have several processes running simultaneously. This means that if the task involves networking or creating an online platform, then the Raspberry Pi would work best.
Frequently Asked Questions (FAQs)
- Can you install Windows on a Raspberry Pi?
Though technically possible through some means of getting the special Windows 11 to run on the ARM system, it’s not recommended due to poor performance. Raspberry Pi OS is recommended for new users.
- Should you know how to code when using a Pi?
It helps, but you don’t need to know it yet. Many projects have code ready for you to simply copy. It is recommended, however, that you learn at least a little bit of Python coding.
- Does the Raspberry Pi 5 model justify its cost over the Pi 4?
Definitely yes. Apart from a built-in power button, the Pi 5 offers very fast SSD storage access speeds compared to the previous generation of Pis.
- Can the Raspberry Pi get viruses?
Just like any other device, it can be infected. But since it uses Linux, all those viruses for Windows computers won’t harm it. Make sure you change your default password for safety.
- Will you lose anything if I just pull the plug?
You might corrupt files saved on the microSD card. This problem is widespread among Raspberry Pi users. Make sure to use “Shutdown” via the menu or use sudo halt in the terminal.
Conclusion: Start Your IoT Journey
You now have a clear roadmap for using a Raspberry Pi for beginners. You understand the hardware requirements and the steps to install the OS. This board is more than a toy; it is a professional tool for learning networking and automation. I recommend starting with the Pi-hole project. It provides immediate value to your home and teaches you the basics of Linux networking. Grab your board, a high-quality SD card, and start building today.
Reference: wikipedia
Explore more IoT tutorials, projects, and beginner guides on my blog: iot.technaga