You might want to build a robot that follows a light source. Or maybe you need a sensor that pings you when your office plants are dry. You can make these ideas real with an Arduino UNO. It is the most used open-source electronics board right now. The business supplied more than 10 million official boards to manufacturers by 2024. In this guide, I’ll show you how to create your first program and how the hardware works. You’ll be ready to start working on your own electrical projects after reading this.
What Is Arduino UNO?
Arduino UNO is a small circuit board used to control devices such as sensors, motors, and lights. It helps you interact with physical components using simple code.
The board was introduced in 2005 by the Interaction Design Institute Ivrea. It was designed as a low-cost option for students and beginners to learn electronics.
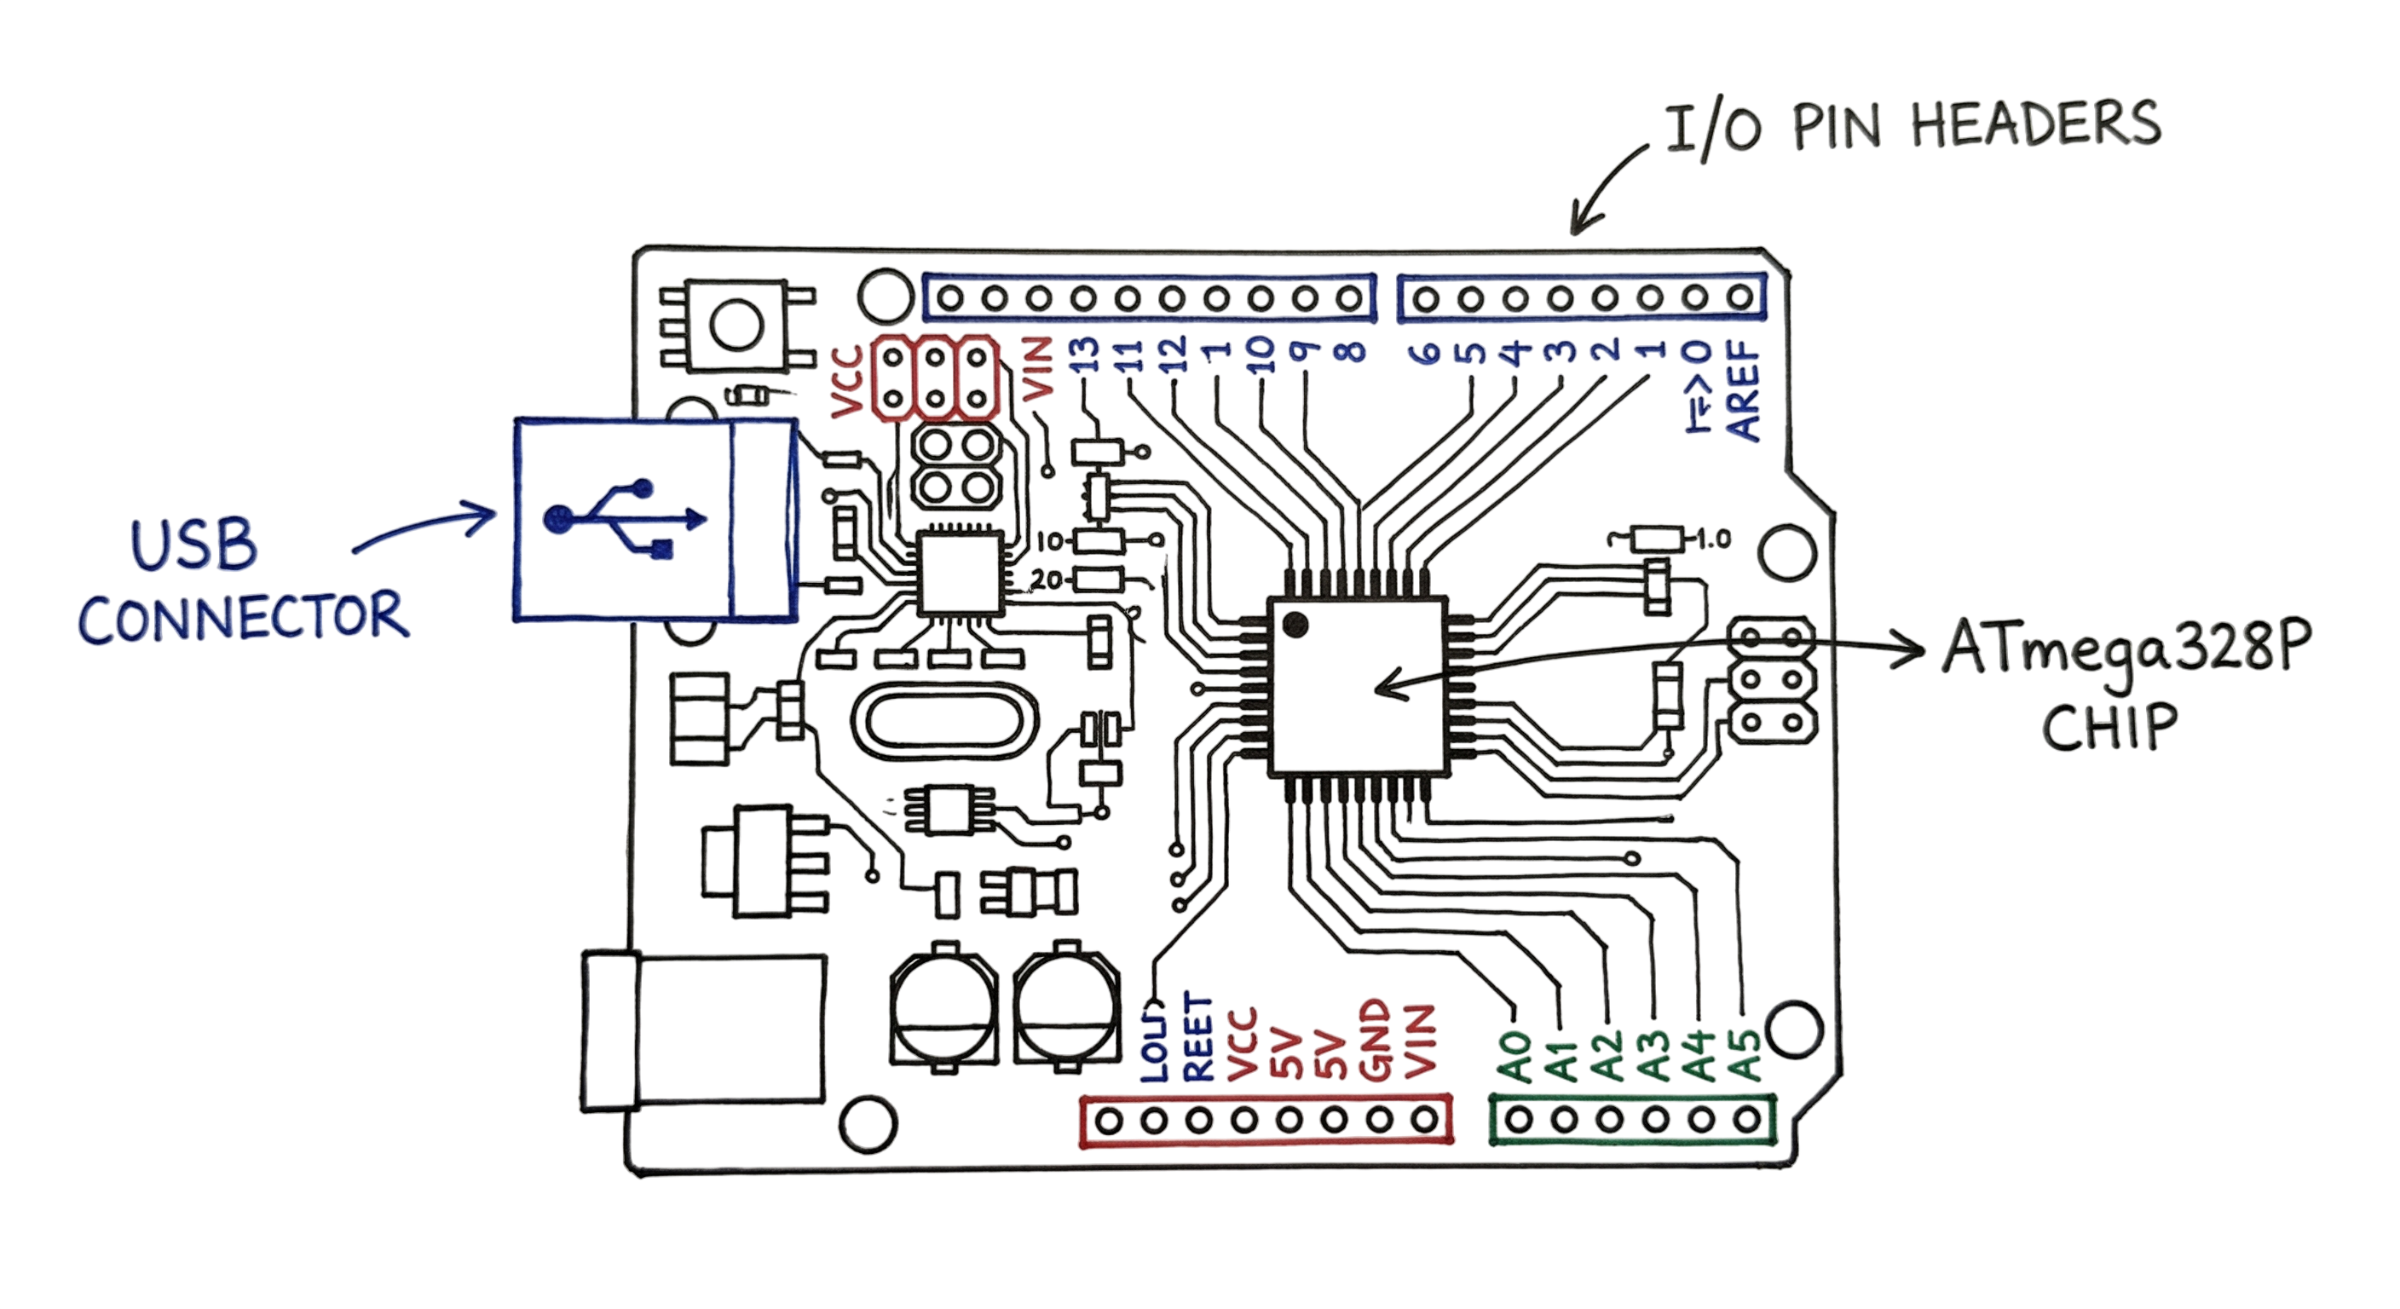
At the center of the board is the ATmega328P microcontroller. This chip acts as the brain of the system. It runs your program and controls all connected devices.
Arduino UNO operates at 16 MHz and 5V. This allows it to execute around 16 million instructions per second.
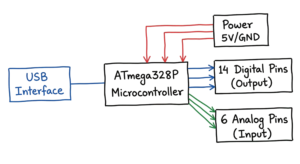
The board includes:
- 14 digital pins for input and output operations
- 6 analog pins for reading sensor values like temperature or light
Digital pins are used to send or receive ON/OFF signals. Analog pins are used to read varying voltage values from sensors.
The board also has a USB port. You use it to connect the Arduino to your computer for programming and power.
How Does Arduino UNO Work?
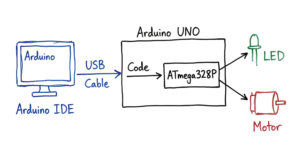
The Arduino UNO follows a simple logic to perform tasks. You provide instructions, and the board executes them. The process moves from your computer to the physical board. You connect the board to your laptop using a USB cable. This cable provides power and a path for data. The workflow for every project follows these specific steps.
- You write a set of instructions on your computer.
- You click a button to check for errors in your code.
- You upload the instructions to the board through the USB port.
- The board stores the code and begins to run it immediately.
Now comes the fun part. The interaction of the board with the outside world happens via the pins. In the Arduino UNO pin configuration, there are 14 digital I/O pins. Out of these, there are six PWM capable pins. PWM is used when you want to fake power consumption by using it for things like LED blinking. Then there are six analog inputs that sense voltages. All this information is processed by the ATmega328P microcontroller inside the board. Then commands are sent to external components like motors or display panels.
What Programming Skills Do You Need?
You don’t necessarily have to study computer science to begin working with Arduino. Programming Arduino for beginners is quite easy. It utilizes a form of C++ coding that is very easy to learn. You just need to know some of the basics to be able to begin programming. Programs follow a set pattern of structure in two sections.
The first part is the setup() function. This code runs only once when you turn the board on. You use it to tell the board which pins you are using. The second part is the loop() function. This code runs over and over as long as the board has power. It allows the board to check sensors and update outputs constantly. You can find thousands of free examples online. The Arduino Project Hub offers many step by step guides. You can also use the built-in examples inside the software.
How to Use the Arduino IDE Software
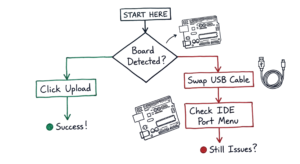
You need a tool to write and send instructions to your board. This tool is the Arduino IDE software. IDE stands for Integrated Development Environment. It is a basic text editor with electronic-specific buttons. Version 2.x is available for Linux, Mac, and Windows downloads. Your code is the main emphasis of the neat interface. I’ve learned the hard way that a bad USB cable can look like a dead board, so always swap the cable first if the IDE does not see your UNO.
To get started, follow these five steps.
- First, you install the software from the official website.
- Second, you open the application and connect your board via USB.
- Third, you select “Arduino UNO” from the board menu.
- Fourth, you write your code in the main window.
- Fifth, you click the “Upload” button to send the code to the board.
If you have trouble, use the Serial Monitor tool. This tool lets you see text messages from your board on your screen. It is the best way to find and fix mistakes in your logic. In real environments, it doesn’t work this cleanly, especially when noisy electrical signals cause serial data to look like gibberish.
Basic Arduino UNO Projects for Beginners
Starting with small tasks builds your confidence quickly. These Arduino UNO projects focus on core skills. Each one introduces a new component or coding concept.
- LED Blink: Program the board to turn a light on and off every second. Learn how to control digital outputs.
- Push Button Control: This example shows you how to turn an LED on when a push button is pressed. It shows you how to read digital inputs.
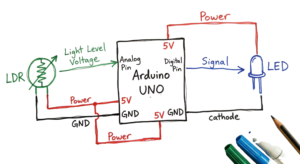
- Potentiometer Dimmer: You turn a knob to change the brightness of a light. This project covers analog input and PWM.
- Temperature Monitor: Learn how to read a sensor to get the room temperature.
- Buzzer Alarm: This Instructable shows you how to make a buzzer alarm. Connect a speaker, a battery, a resistor, and an IR diode together. Program the speaker to beep when the IR diode detects movement. This project combines input and output together.
These projects use common parts found in most starter kits. They provide the foundation for more complex builds later.
Real-World Example
Akhila is a high school student preparing for her school’s annual science fair. She builds an automated garden system that monitors and maintains soil moisture.
Her setup uses a moisture sensor to measure the water level in the soil and a small water pump to irrigate the plants. The entire system is controlled by an Arduino UNO.
Every hour, the board checks the soil moisture. If the soil is too dry, it activates the pump for 10 seconds to supply water.
This system removes the need for manual watering and keeps the plants at a healthy moisture level. Her simple and effective solution helps her win first place.
This is a practical example of how basic electronics can solve real problems.
Arduino UNO vs Microcontroller: What’s the Difference?
Many beginners get confused between an Arduino board and a microcontroller. Understanding the difference makes things much clearer.
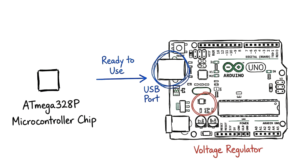
A microcontroller is a single chip that performs all processing tasks. In Arduino UNO, this chip is the ATmega328P. On its own, a microcontroller is not easy to use. You need to design a proper circuit for power, clock, and communication before it can work.
An Arduino UNO board solves this problem. It comes with everything already built and ready to use.
The board includes:
- A voltage regulator to provide stable power
- A USB port for programming and communication
- Crystal oscillator for timing
- Pin headers to easily connect sensors and modules
Because of these built-in components, you can start working without designing complex circuits. This makes Arduino UNO a practical choice for beginners.
Benefits of Arduino UNO
There are many reasons why this board remains the industry standard. It offers a balance of power and simplicity.
- Low Cost: You can buy an official board for a small price. This makes it affordable for students and schools.
- Large Community: Millions of people use this board every day. Nearly every query may be answered in the Arduino Forum.
- Beginner Friendly IDE: The program is simple to use and understand. It removes the complex steps usually required for hardware programming.
- Wide Compatibility: Most sensors and modules are designed to work with this board. You can find thousands of compatible parts in any electronics shop. We had a client running Palo Alto NGFWs alongside Zscaler ZIA, and their split-tunnel config was sending DNS queries outside the tunnel, which reminded me why I always value the simple, isolated environment of an UNO for testing sensors.
- Open Source: The designs are free for anyone to use or change. This has led to many high quality clones and specialized versions.
- Durability: The board is robust and capable of withstanding little wiring errors. For those who are still learning, this makes it a secure option.
Start Building with Arduino UNO Today
You now know how the Arduino UNO works. Now you know how to manipulate the actual world using the ATmega328P IC. It is a very useful device that makes your ideas come true. All you have to do is install the software and get started on the LED blinking tutorial. Everyone starts somewhere and you will be no exception
Reference: wikipedia
If you found this helpful and want more IoT projects and guides, visit IoT TechNaga.
NOTE:-This content is written based on my personal research and practical understanding. Before applying any concepts or configurations in real-world scenarios, make sure to verify the details from official documentation or trusted sources.