IoT development boards play a critical role in how well your project performs in real conditions. In my experience working with different boards, I’ve seen how the wrong choice leads to problems later, while the right one makes development smooth and reliable.
If the board does not have enough memory or processing power, issues show up during implementation. The code may compile successfully, but it can crash, lag, or fail when handling sensors, network communication, or background tasks. I’ve seen this happen when a basic microcontroller is pushed to run Wi-Fi-heavy or multi-tasking workloads.
Also, the usage of too many boards in any Internet of Things (IoT) application leads to huge expenses for the user since the process consumes a lot of power. As a result, the use of batteries will lead to their rapid drainage. In my case, a new smaller board replaced an old larger one, which helped double the time of battery life but did not affect the function of the device at all.
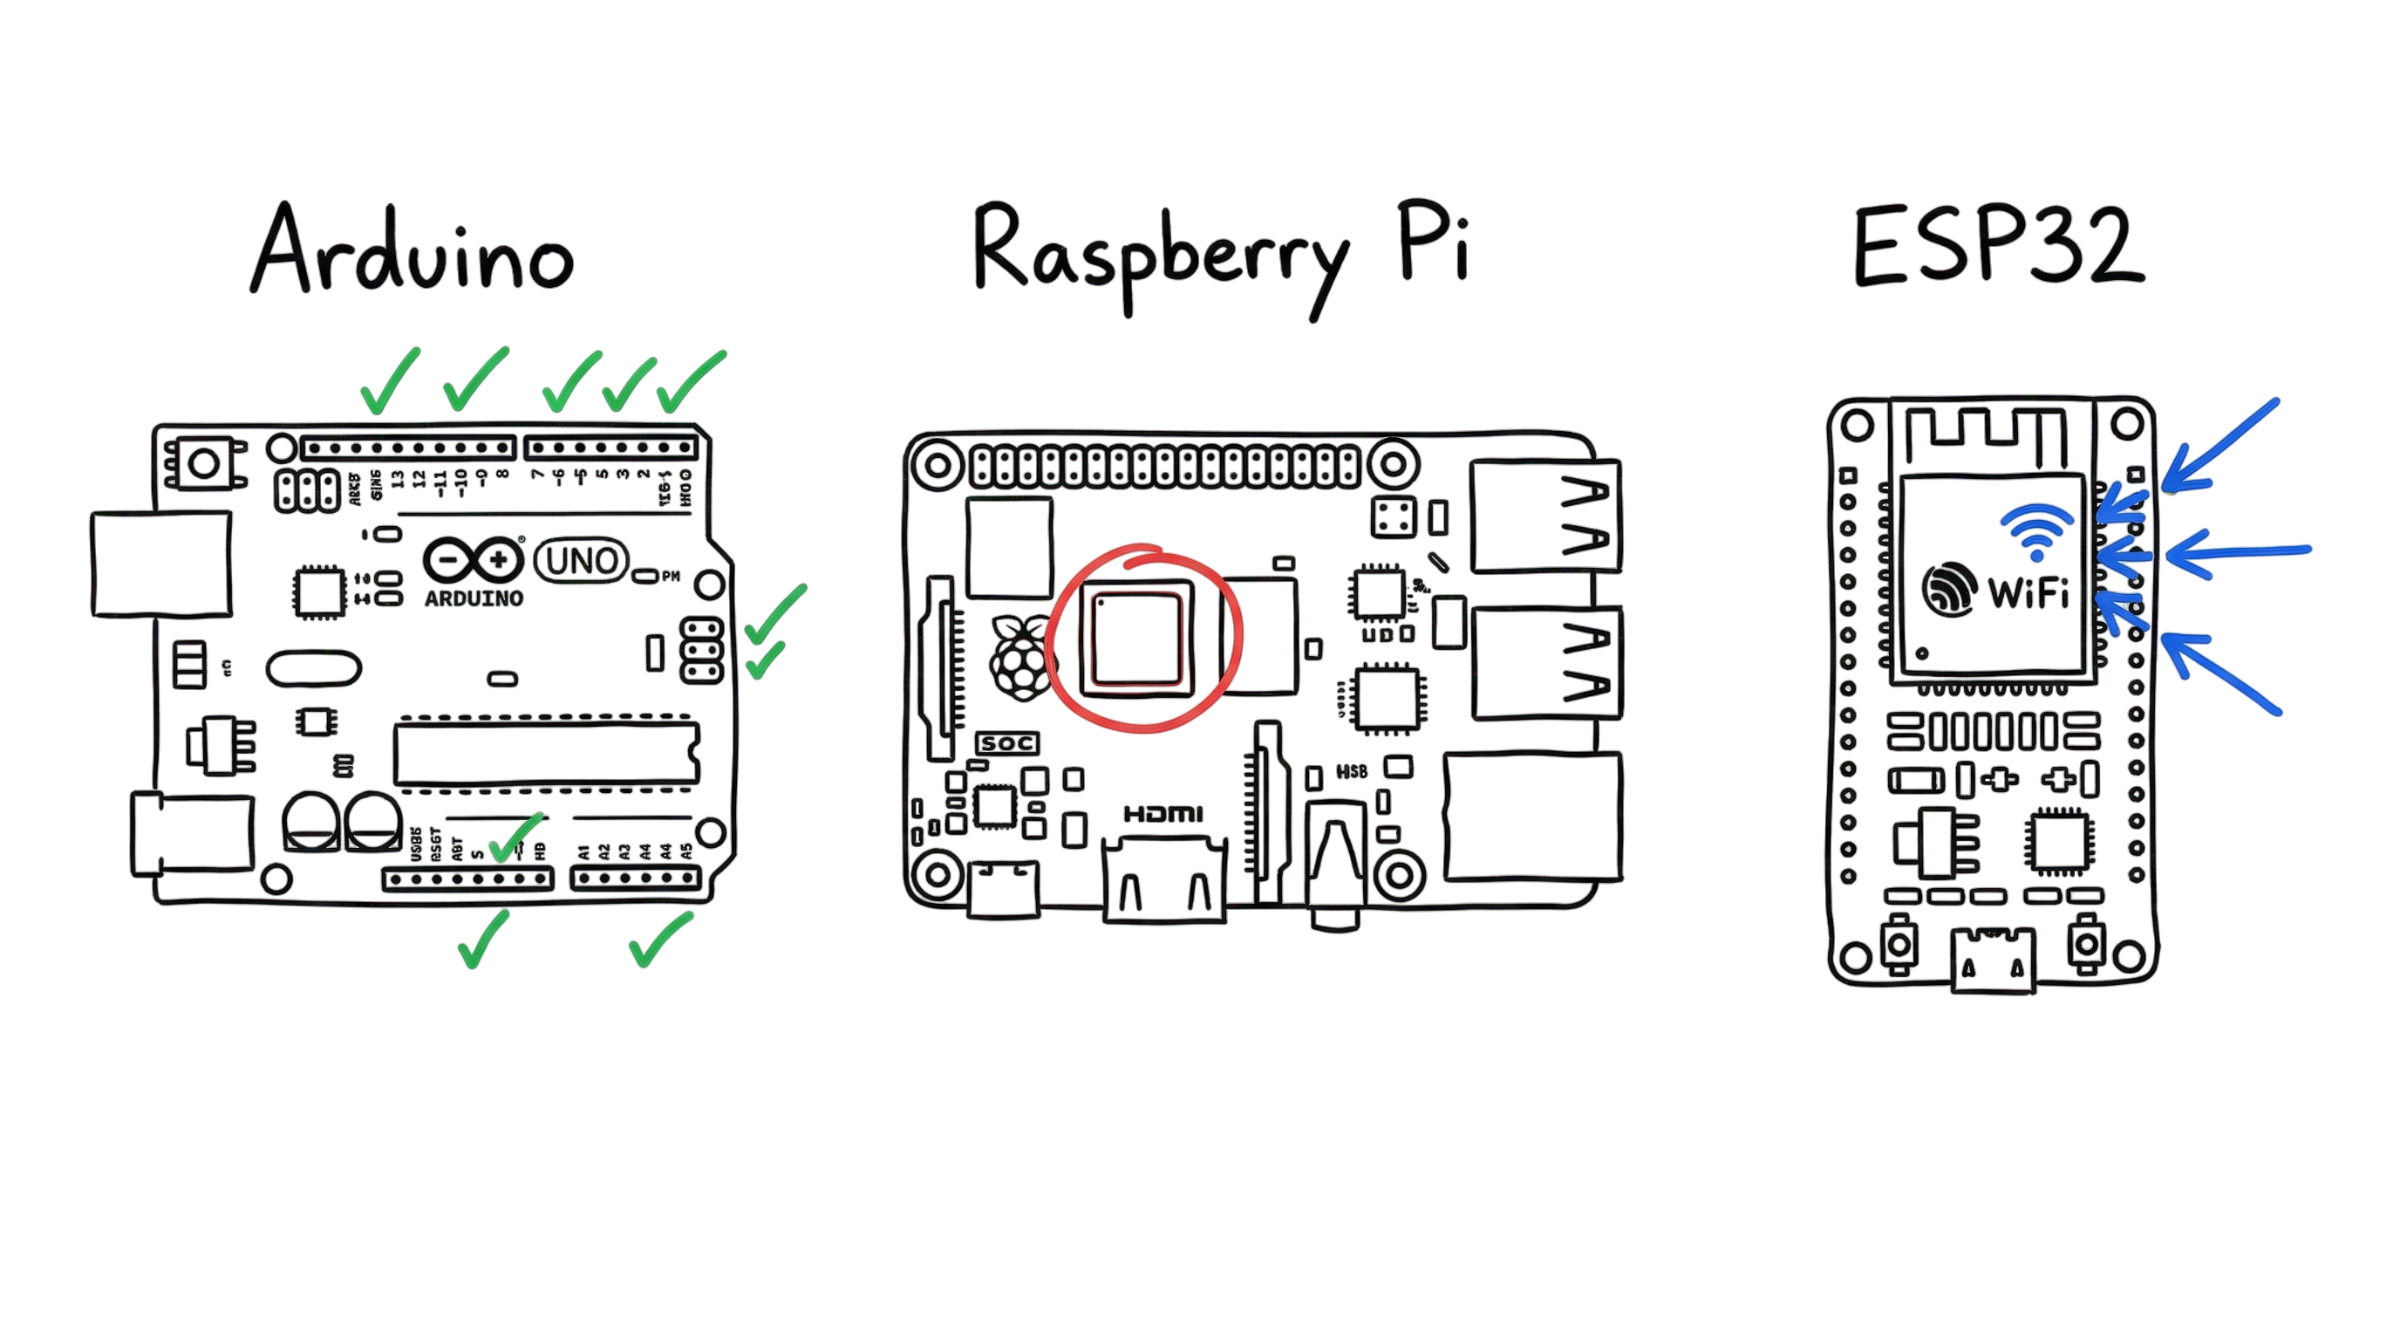
Thus, having learnt some facts, I have chosen three boards which can be used to make an IoT device. These include Arduino UNO, Raspberry Pi, and ESP32.
The first option is Arduino UNO. It can be selected when one needs reliable operation and complete hardware control. This board would fit any IoT project involving sensors or simple automation systems, which require precise timing of tasks. In my practice, I used this board for developing the motion-based lighting system, which required reliability rather than increased computational power.
The second computer we have is Raspberry Pi. This is useful in an IoT development project when there is a need for the device to run with an operating system or graphics and perform heavy computation tasks. This computer can be used in developing devices like a server, dashboard, or an IoT device with Python scripts.
Finally, ESP32 is the middle option that is utilized in most of my IoT projects due to its convenient features.It contains the in-built WiFi and Bluetooth communication protocols, sufficient processing power, and low power consumption. I applied this board when implementing real-time monitoring systems that send data to the cloud while collecting information from sensors.
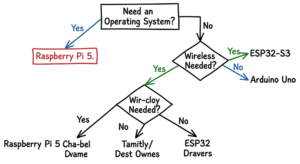
Based on my experience, the best strategy in choosing the appropriate board is matching the hardware characteristics to the particular IoT requirement. Thus, one should answer the following questions: do I need the operating system? Is wireless connectivity required? How significant is the power consumption issue?
This article would present a step-by-step guide in choosing the most appropriate IoT development board based on their practical application.
What Are IoT Development Boards?
Consider an Internet of Things development board as the brain of your IoT project. In practical applications, this “brain” determines the speed of your device’s reaction, its stability, and its power consumption.
The development board is simply a printed circuit board that holds a processor, some memory (optional), and I/O ports where you can plug in the sensor, relay, motor, or another module. After programming and uploading the code, the board becomes a master and controls all processes according to your algorithm.
From my experience, beginners do not have any challenges connecting the sensors. All the problems usually appear later when the board is not adequate for the task.
Microcontrollers vs. Single-Board Computers
Microcontrollers (MCU)
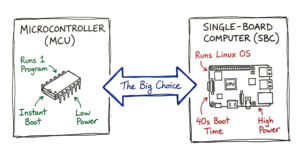
A microcontroller is a compact chip designed to do one job efficiently. It runs a single program in a loop. The moment you power it on, it starts executing your code without waiting for anything else.
Boards like Arduino UNO and ESP32 fall into this category.
From real usage:
- You get fast startup (usually under 1 second)
- Very low power consumption (ideal for battery projects)
- Direct control over hardware (pins respond instantly)
Example:
If you are building a temperature monitoring system that reads a sensor every 2 seconds and triggers a fan, a microcontroller handles this cleanly. No delay, no overhead.
But there are limits:
- No real multitasking like a computer
- Limited RAM (often KB to a few MB)
- Not suitable for heavy processing or UI
I’ve seen projects fail when people try to run web servers, camera processing, or large data handling on basic MCUs without planning.
Single-Board Computers (SBC)
A single-board computer is a complete system packed into one board. It includes a processor, RAM, storage support, and runs an operating system like Linux.
The most common example is Raspberry Pi.
From real usage:
- You can run multiple applications at once
- Supports Python, databases, web servers, dashboards
- Can connect to monitor, keyboard, mouse
Example:
If you want to build a home automation dashboard with a web interface, store logs, and analyze data, an SBC is the right fit.
But there are trade-offs:
- Higher power consumption (not ideal for batteries)
- Slower startup (20–40 seconds boot time)
- More complexity (OS crashes, updates, SD card issues)
In one of my projects, I used a Raspberry Pi for a monitoring system. It worked well for visualization, but when I tried to run it on battery, it drained quickly. I had to redesign using an ESP32 for sensing and keep the Pi only for the dashboard.
Arduino: The Beginner’s Foundation
Arduino is where most people start. The software is simple and the community is massive. The Arduino Uno R3 is the classic choice. It uses an 8-bit processor. It is tough and survives wiring mistakes well.
The New Arduino Uno R4
The Arduino Uno R4 is a big change for the platform. You can get it as the Minima or the WiFi version. The WiFi model is a strong tool for IoT development boards. It uses a Renesas RA4M1 processor at 48 MHz.
The Uno R4 WiFi actually has an ESP32-S3 module inside. This gives you wireless connectivity with WiFi and Bluetooth. It also has a 12×8 LED matrix on the board. You can show data or icons without buying extra parts.
Why Choose Arduino?
- Simple Logic: It is great for basic tasks like opening a door or reading a dial.
- 5V Logic: Many older sensors use 5V. You can plug them right in.
- Large Community: If you hit a bug, someone has already fixed it online.
Raspberry Pi: The Powerful Linux Computer
Raspberry Pi is unlike Arduino. It is a complete computer system. One can plug in the keyboard, monitor, and mouse. The Raspberry Pi 5 is currently the best.
Performance of Raspberry Pi 5
This version of the device is faster than its predecessor – Pi 4. The processor used is BCM2712 and runs on 2.4 GHz. There is also a new component known as RP1. This component manages all the GPIO pins and the USB ports.
There is a downside to the increased processing capability. It requires an external power source – 5V 5A PSU. This board runs hot. One needs a heatsink or fan to avoid it from slowing down.
Pi 5 Challenges
One issue with this board is the RP1. In previous boards, the CPU was talking directly to the pins. The addition of the RP1 introduces a bit of delay. It means one loses out on microseconds when dealing with GPIO pins. According to my experience, for camera triggering that needs speed, the Raspberry Pi 4 could perform better.
Why Go For The Raspberry Pi?
- Heavy Lifting: Use it in local databases and web servers.
- Media Processing: Perfect for high-definition video and camera feeds.
- Multitasking: Can host multiple services at once.
ESP32: The King of Wireless IoT
The ESP32 is what we use for most modern IoT gear. It is a microcontroller with WiFi and Bluetooth. It is cheaper than a Pi and more efficient than an Arduino.
ESP32-S3 and Other Variants
There are many versions of this chip. The ESP32-S3 is the powerhouse. It has two cores and runs at 240 MHz. It has built-in features to help with AI tasks.
For simple tasks, look at the ESP32-C3. It is small and cheap. It uses less power and fits into tight spots.
Low Power Consumption Modes
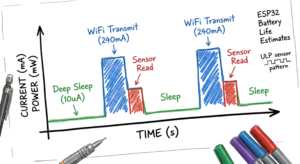
Now here’s where it gets interesting. The ESP32 is great for battery life because it has five power modes.
- Active Mode: Everything is on. Uses about 240mA.
- Modem Sleep: The CPU runs, but WiFi and Bluetooth stay off.
- Light Sleep: The CPU pauses but wakes up fast.
- Deep Sleep: Only the clock stays on. Uses about 10µA.
- Hibernation: Almost everything shuts down. Uses about 2.5µA.
A board in Deep Sleep can run on a battery for a year. It wakes up, sends data over WiFi, and goes back to sleep.
Comparing the Top IoT Development Boards
This is where most people get confused. This table shows the main differences.
| Feature | Arduino Uno R4 WiFi | Raspberry Pi 5 | ESP32-S3 |
| Type | Microcontroller | Single-Board Computer | Microcontroller |
| Processor | 48 MHz | 2400 MHz | 240 MHz |
| Operating System | None | Linux | None (or RTOS) |
| Wireless | WiFi & Bluetooth | WiFi & Bluetooth | WiFi & Bluetooth |
| Power Use | Low | Very High | Very Low |
| Best For | Beginners | Servers & Media | Battery Projects |
Real-World Scenario: Smart Home Monitoring
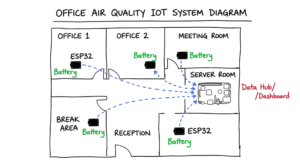
I once worked on a project to track air quality in a large office. Putting a Pi 5 in every room would cost too much. We would also have to hide power bricks everywhere. In real environments, that does not work cleanly.
Instead, we put an ESP32 in each room. They ran on batteries for months because they stayed in Deep Sleep. They sent data to a single Raspberry Pi 5 in the server room. The Pi acted as a central hub. It gathered the data and showed it on a dashboard. This is a classic setup that uses each board for what it does best.
Choosing Your First Board
Follow these simple rules to pick your hardware.
Start with Arduino if:
You are new to this. You want to learn how sensors work and do not need the internet yet. The Uno R3 is the safest start.
Pick a Raspberry Pi if:
You want to run a server or a database. You need to use a camera or a screen. The Pi 5 gives you the most speed for software.
Choose an ESP32 if:
You are making a smart device. You need to use a battery and want to connect to a web app. The ESP32-S3 is the best all-around choice.
Programming Your Board
Most people use the Arduino IDE. You write code and upload it with a USB cable. It is very simple.
The ESP32 works fine with the Arduino IDE. But for pro projects, we use the ESP-IDF. It is harder to learn. It gives you more control over the hardware. That is why it is used for commercial products.
The Raspberry Pi uses Python. It is a great language for beginners. You can also use C++ or Java since the board runs Linux.
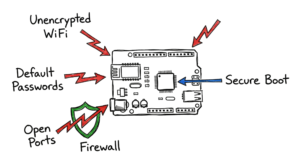
Safety and Power Tips
Power issues will kill your board. Keep these tips in mind.
- Use a Good Supply: Bad USB cables make Pis crash. Use the official power brick whenever you can.
- Check the Voltage: ESP32 pins run on 3.3V. If you touch them with 5V, you will destroy the chip.
- Use Active Cooling: The Pi 5 gets hot fast. Use a fan so it does not slow itself down.
Conclusion
Your goal defines your board choice. An Arduino Uno R4 is great for simple logic and learning. A Raspberry Pi 5 handles heavy software and video. An ESP32 is the best for wireless battery projects.
Test your ideas on a breadboard before you solder anything. Use the right tool for the job. Check your sensor power before you plug into the GPIO pins. Your journey into connected devices starts here.
Reference:
- Arduino UNO → https://en.wikipedia.org/wiki/Arduino
- Raspberry Pi → https://en.wikipedia.org/wiki/Raspberry_Pi
- ESP32 → https://en.wikipedia.org/wiki/ESP32
If you want to understand how this board works in detail, read my guide in IOT Technaga