The first major obstacle for every novice maker is deciding between Arduino and Raspberry Pi. You wish to construct something interesting. But you do not want to buy the wrong gear. One looks like a blue circuit board with pins. The other looks like a tiny computer with USB ports. Both can turn lights on or move a motor. But they serve very different roles in technology.
In this tutorial, you’ll understand the differences between both types of boards. We’ll see how each board shines and what type is best for your needs. In the end, we’ll get a roadmap for getting started on your first project.
What Is Arduino vs Raspberry Pi?
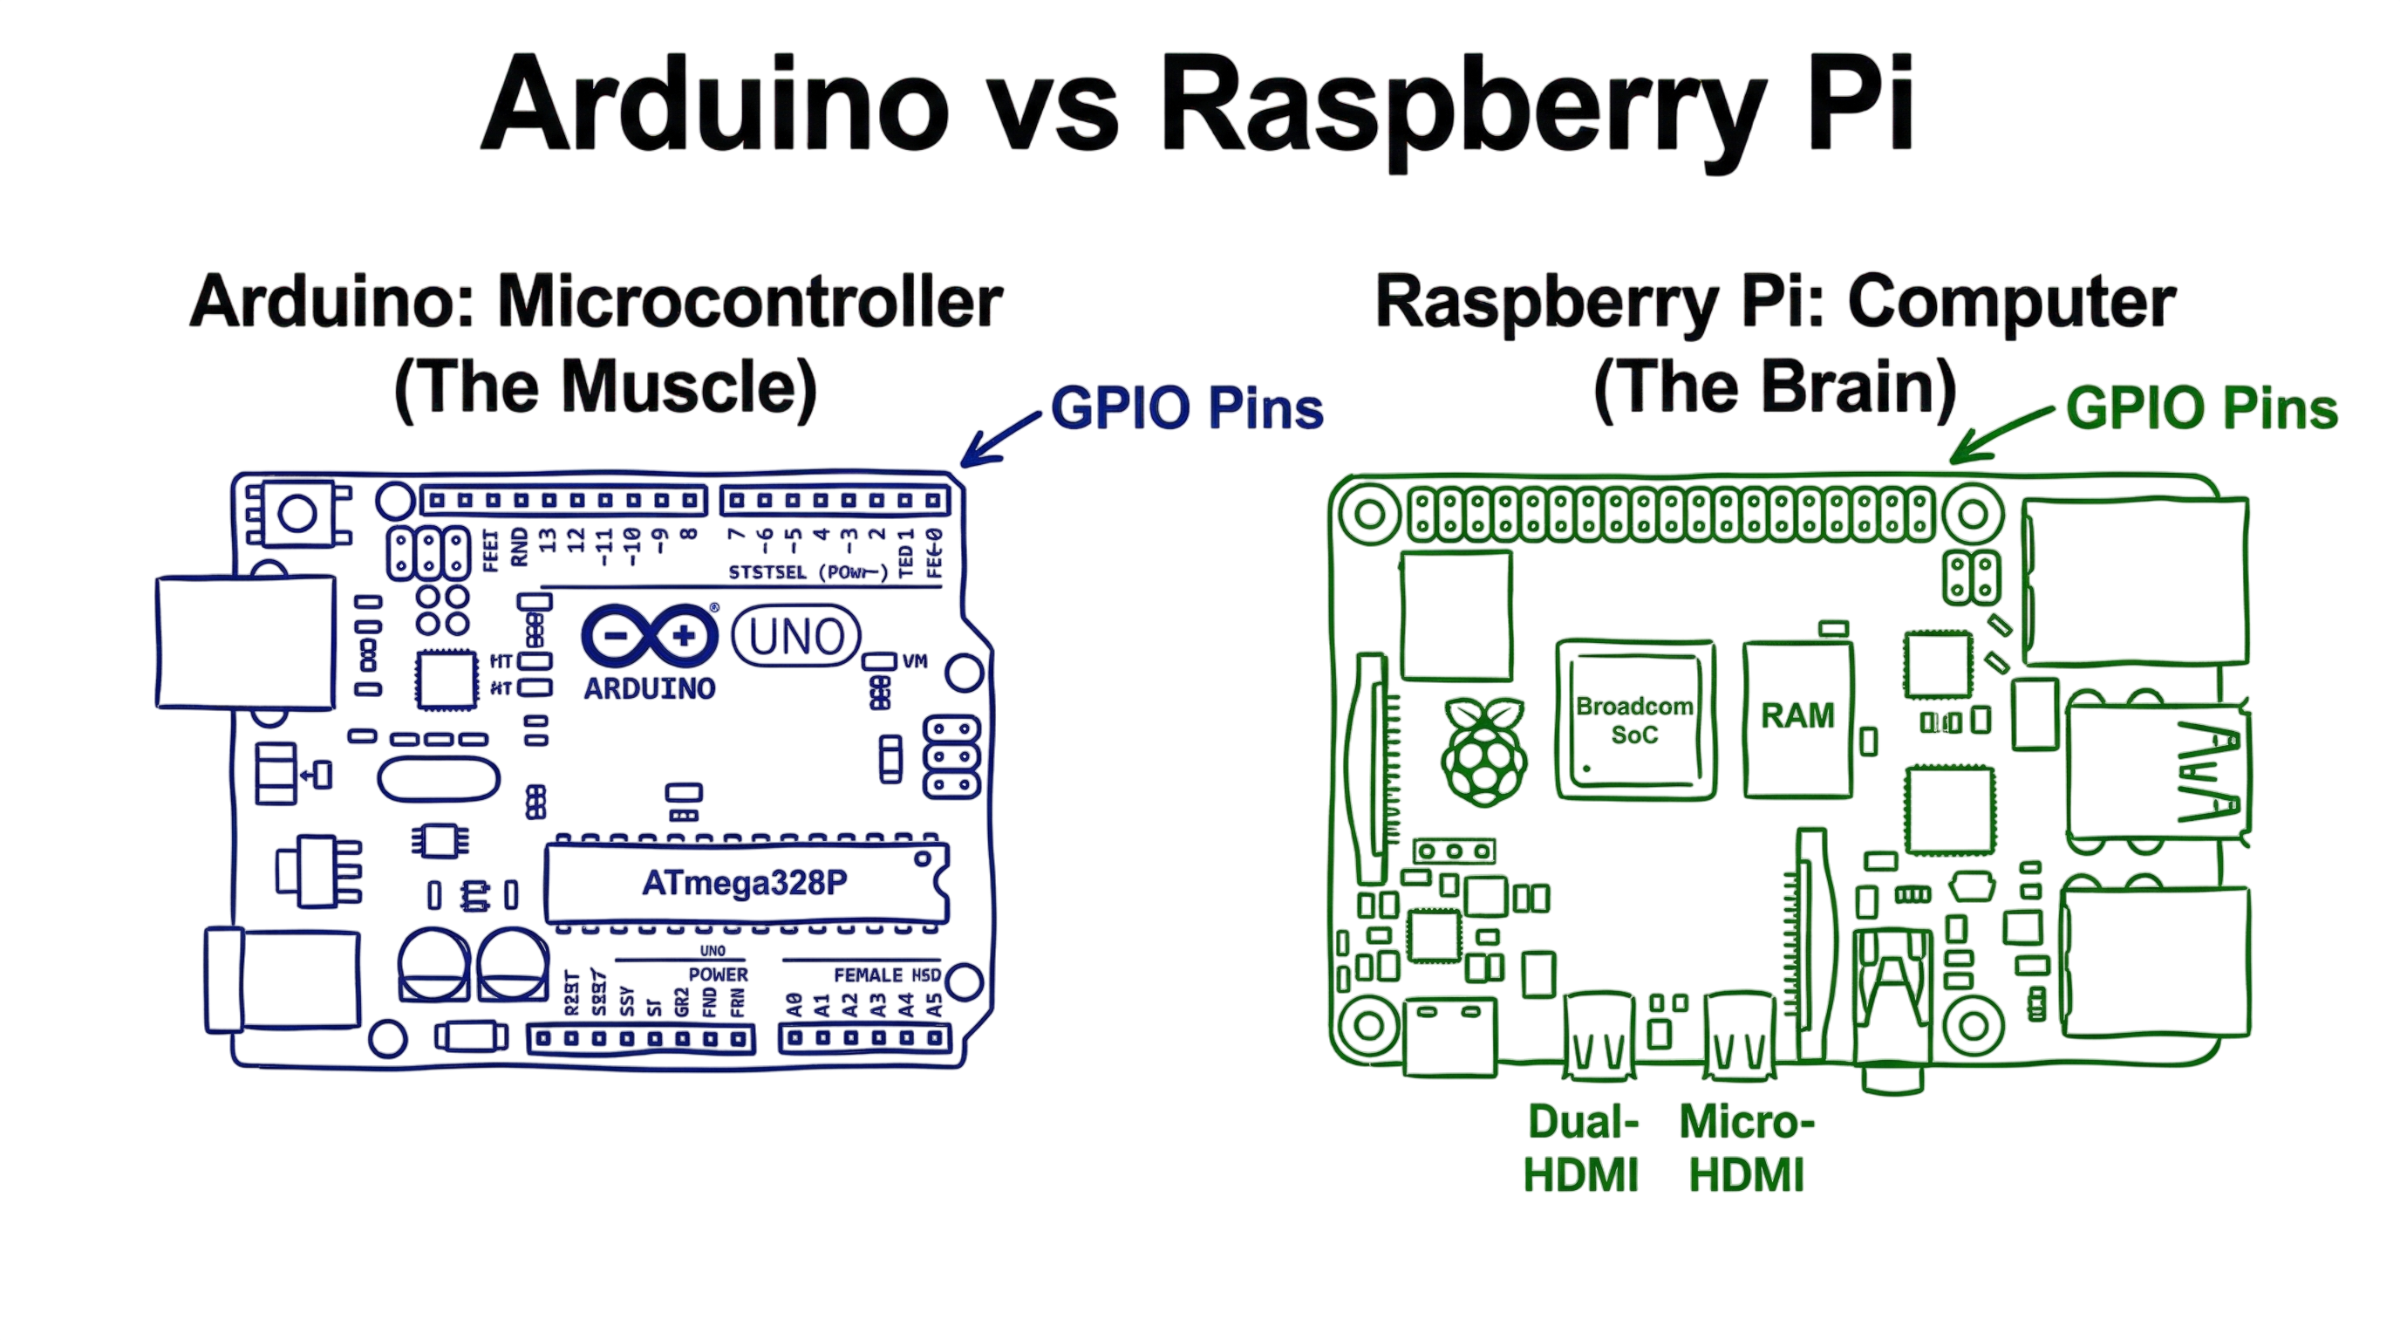
Consider it this way. A microcontroller is what an Arduino is. This suggests that it is a simple computer designed to repeatedly carry out a single task. There is no operating system on it. As soon as you switch it on, your code begins to run. It is effective for operating a single device or reading a sensor.
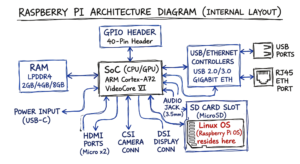
A single-board computer is called a Raspberry Pi. On a single sheet of plastic, it is a complete computer. A variant of the Linux operating system powers it.It is composed of a processor, memory, and mouse and screen interfaces. Raspberry Pi is capable of running several applications at once, but Arduino is limited to running one function.
An Arduino is a dedicated hardware controller. It is reliable and fast for physical tasks. A Raspberry Pi is an all-purpose device. While controlling your equipment, it can check your email, play music, and surf the web.
How Does Arduino vs Raspberry Pi Work?
These two boards process information in different ways. Understanding this helps you write better code for your projects. This is where most people get confused when they try to pick their first board. You aren’t just picking a brand. You are picking a style of computing.
How the Arduino Works
- You write code in C++: You use a program called the Arduino IDE on your main computer.
- You upload the code via USB: The board stores this code in its flash memory.
- The code runs in a loop: The board executes two main blocks “setup” and “loop.” The setup part runs once. The loop part repeats forever.
- This code communicates directly with the hardware: The GPIO pins connect to the sensors. “GPIO” means “General Purpose Input Output.” The pins are used by the board to send and receive electrical data.
How the Raspberry Pi Works
- It starts from the SD card: The SD card will have the Linux operating system installed on it.
- You use numerous programming languages: People mostly use Python, but practically you could use just about anything you want.
- The OS controls all the hardware: Instead of sending signals to the pins, you communicate with the operating system for this.
- It interacts with the outside world: It has inbuilt Wi-Fi and Ethernet. It can communicate easily with databases or servers.
For the coders, here is when things start to get interesting. You can run a complete web server or database directly on the Pi because it has an operating system. That is not possible with a normal Arduino.
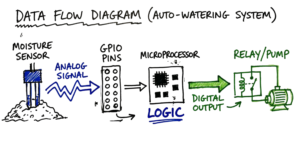
Real-World Example: Building a Smart Garden
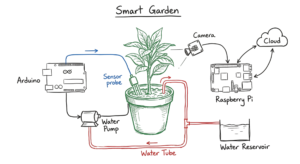
Suppose you wish to maintain your plants alive while you travel.
In this case, both the Arduino board and moisture detector have been plugged into the water pump. It is coded in a manner where “the water pump will be turned ON after five seconds in case there is no presence of moisture in the soil.” The whole process of using this Arduino board takes place all through the year inside a small closed box where the Arduino board is protected from any weather damage.
The Raspberry Pi will make the process more intricate. In addition to watering the plant, the device allows for a camera to capture images as the plant grows. The Pi uploads the pictures to your blog. It also sends you emails when the water reservoir empties. It requires high amounts of electricity, and you always plug it into the wall socket.
Real-World Scenario: The Overwhelmed Gateway
I once worked on a project for a small warehouse. We used a Raspberry Pi as a central hub to collect data from ten different rooms. The Pi was supposed to log everything to a cloud server. But we ran into a problem. Every time the power flickered, the Pi would shut down improperly. This corrupted the SD card. The whole system would crash.
In real environments, it doesn’t work this cleanly because hardware is sensitive to power. We had a client running Palo Alto NGFWs alongside Zscaler ZIA. Their split-tunnel config was sending DNS queries outside the tunnel. This meant their local Pi could not resolve the cloud endpoint. We spent days tracking that down.
To fix the warehouse issue, we put an Arduino in each room to handle the actual sensors. The Arduinos were rugged. They did not care about power flickers. They sent their data to the Pi using a protocol called MQTT. This setup used the strengths of both. The Arduino handled the messy physical world. The Pi handled the complex data and internet connection.
Common Risks and Challenges
Learning these boards comes with a few traps. You should know about them before you start.
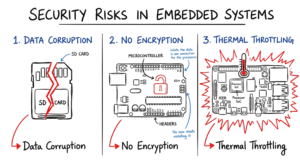
- SD cards can become corrupted easily on the Pi: When you disconnect the cable from the device without powering off, your files will be lost.
- Arduino boards have minimal RAM: Large files and sophisticated AI algorithms cannot be run using the conventional Arduino board.
- The GPIO pins are prone to damage: When you exceed the voltage that should pass through a pin, you destroy the chip. Resistors should always be connected.
- The Raspberry Pi is heat-sensitive: When operating intensive programs, a heatsink or a fan is required.
- Arduino has no inbuilt security protocols: There are no mechanisms for logging in and securing the device.
- Power consumption fluctuates: The Pi consumes much more energy than required even when idle.
How to Improve and Secure Your Projects
There are a number of ways through which you can extend the life of your project and improve performance. First, the power rail is what I always check first in case of no bootup on my board. I have lost more than one week debugging some applications only to be told that the 5V supply voltage is only giving out 4.2V.
Here comes the exciting part! By implementing a watchdog timer, you get yourself a miniature digital security guard for your main application code.
- Get a reliable power source: Cheap power supplies cause the Raspberry Pi to report low voltage problems.
- Install a heatsink to your Pi: Miniature metal sinks help dissipate heat from the CPU.
- Know how to use a breadboard: This enables you to easily connect wires without having to solder them.
- Change default password to your pi: Once connected to the internet, people will try to hack using default user credentials.
- Implement External Watchdog Timer: This will help automatically reset your board when the code hangs up.
- Implement SSH keys for your Pi: Instead of passwords use an encryption digital key to log in.
Tools and Technologies
You will need a few extra items to get the most out of these boards. Here is a list of real tools that experts use.
| Tool Name | What It Does | Use Case |
| Multimeter | Measures voltage and current. | Troubleshooting why a sensor is not working. |
| Thonny | A simple Python editor. | Writing and testing code on the Raspberry Pi. |
| Arduino IDE | The standard code editor. | Writing C++ and uploading it to an Arduino. |
| Putty | A remote terminal tool. | Logging into your Pi from a different computer. |
| BalenaEtcher | A tool to flash SD cards. | Installing the operating system on a new Pi. |
Frequently Asked Questions (FAQs)
Q1: Which one is more affordable to start out with?
A: Generally, Arduino Uno tends to be more affordable. One can get Arduino clones for under $10. A Raspberry Pi setup, along with the required accessories, will cost at least $50.
Q2: Is it possible to run Windows on a Raspberry Pi?
A: Not really. Almost all its distributions come with Linux. There is a Raspberry Pi OS Windows IoT. Still, this is not the same Windows we have on our laptops.
Q3: Is soldering skills required?
A: No. One may just plug everything into breadboards and wire things up using cables.
Q4: Which board is better for robotics applications?
A: The common practice is to use Arduino to control the motors while employing a Raspberry Pi board as the “brain” analyzing voice and video data.
Q5: Which board is more suitable for a total beginner?
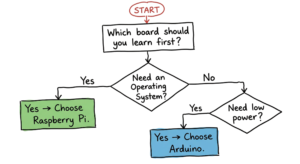
A: To begin with electronics, go with Arduino. If programming and the internet are of more interest, Raspberry Pi is the choice.
Conclusion
When deciding between Arduino vs Raspberry Pi, you should consider your project goals. Use Arduino if you need a robust board for sensor interaction. Opt for Raspberry Pi if you need a computing center to deal with data and internet protocols.
For success, follow these key takeaways:
- Arduino is a microcontroller for straightforward applications.
- Raspberry Pi is a complete computer for sophisticated programming.
- There are numerous outstanding projects created using both boards together.
Also, do not forget about modern opportunities. Today, AI-based assistants such as ChatGPT or Gemini AI can make your project creation and debugging much faster and more efficient.
Forget about finding the “best” choice – any board will be sufficient for your initial projects. Start your journey from creating a simple LED blinking program today. In just an hour, you’ll gain more knowledge than in a week of research online.
Referance: Raspberry pi wikipedia
If you’re new to IoT, start with our beginner guide on IoT fundamentals IOT.Technaga